> ## Documentation Index
> Fetch the complete documentation index at: https://platform.kimi.com/docs/llms.txt
> Use this file to discover all available pages before exploring further.
# 在编程工具中使用 Kimi K2.7 Code 模型
Kimi K2.7 Code 是一款具备超强代码和 Agent 能力的 MoE 架构基础模型,我们以 Claude Code, VS Code & Cline/RooCode 为示例,说明如何使用 Kimi K2.7 Code 系列模型。
## 使用注意事项
在使用大模型进行代码生成时,由于模型的随机性和复杂性,可能需要多次尝试才能生成符合预期的代码。编程工具会自动进行多轮重试和调用,这可能导致 token 用量快速增长。为了更好地控制成本和使用体验,我们建议您注意以下几点:
* **预算控制**
* **设置日消费上限**:在使用前,请前往[Kimi 开放平台项目设置](https://platform.kimi.com/console/projects/settings)配置「项目日消费预算」。一旦达到预算上限,系统将自动拒绝该项目下所有 API 请求(注:由于计费延迟,限制生效可能有约 10 分钟延迟)。设置方式请见[组织管理最佳实践](/guide/org-best-practice)
* **余额预警提醒**:建议开启账户余额提醒功能。当账户余额低于预设金额(默认 ¥20)时,系统会通过短信通知您及时充值。
* **使用建议**
* **持续监控**:建议在编程软件运行期间保持监控,及时处理异常情况,避免因无限循环或过度重试造成不必要的资源消耗。
* **模型选择**:如果对响应速度要求不高,可以选择使用 `kimi-k2.7-code` 模型。
## 获取 API Key
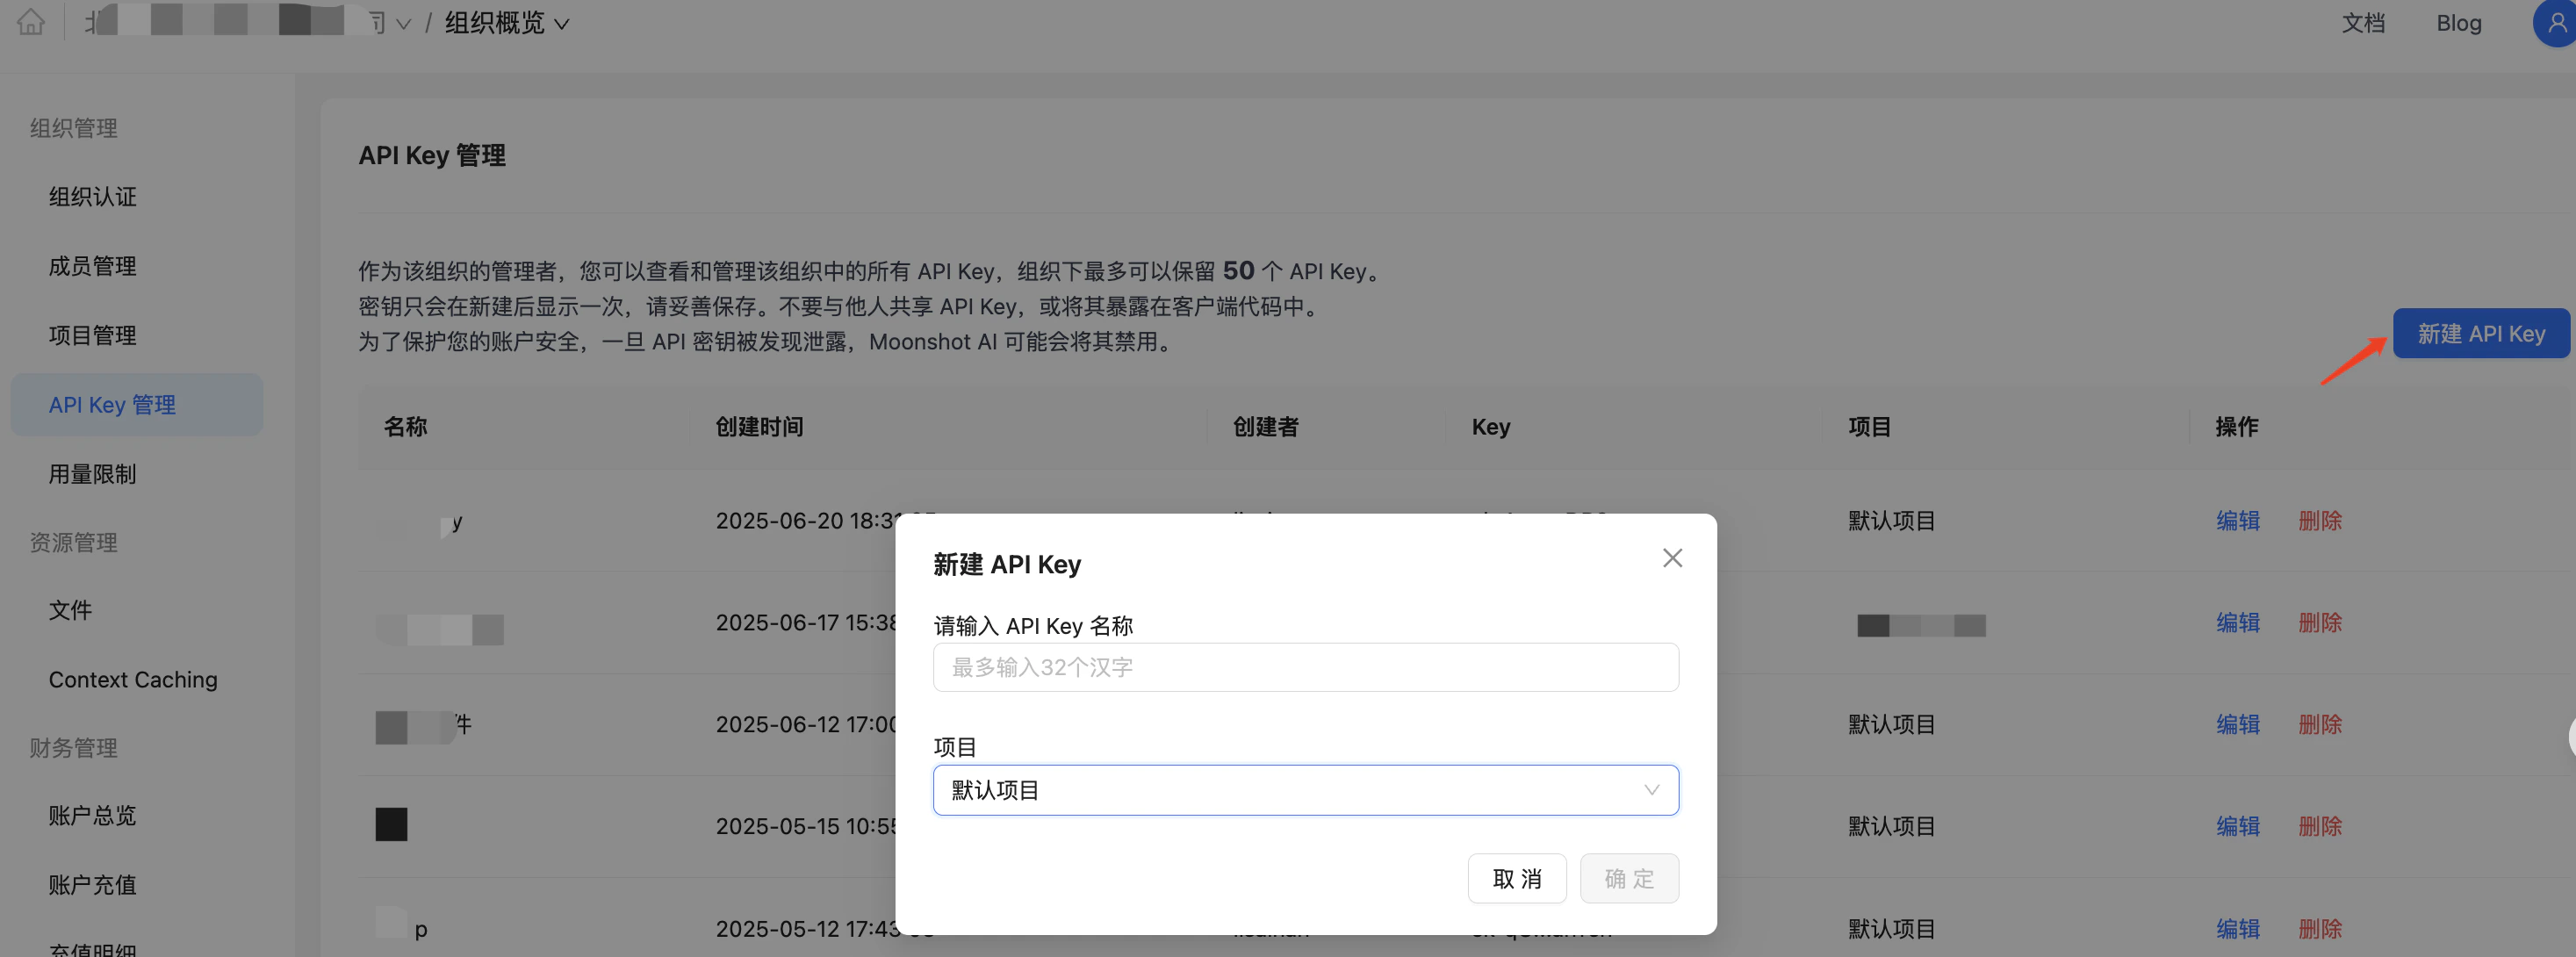
* 访问开放平台 [https://platform.kimi.com/console/api-keys](https://platform.kimi.com/console/api-keys) 创建获取 API Key,选择 default 默认项目。
 ## 在 Claude Code 中使用 Kimi K2.7 Code 模型
### 安装 Claude Code
若您已安装好 Claude Code ,可以跳过这一步
#### MacOS 和 Linux
```shell theme={null}
# MacOS 和 Linux 上安装 nodejs
curl -fsSL https://fnm.vercel.app/install | bash
# 新开一个terminal,让 fnm 生效
fnm install 24.3.0
fnm default 24.3.0
fnm use 24.3.0
# 安装 claude-code
npm install -g @anthropic-ai/claude-code --registry=https://registry.npmmirror.com
# 初始化配置
node --eval "
const homeDir = os.homedir();
const filePath = path.join(homeDir, '.claude.json');
if (fs.existsSync(filePath)) {
const content = JSON.parse(fs.readFileSync(filePath, 'utf-8'));
fs.writeFileSync(filePath,JSON.stringify({ ...content, hasCompletedOnboarding: true }, 2), 'utf-8');
} else {
fs.writeFileSync(filePath,JSON.stringify({ hasCompletedOnboarding: true }), null, 'utf-8');
}"
```
#### Windows
```powershell theme={null}
# 打开 windows 终端中的 powershell 终端
# windows 上安装 nodejs
# 右键按 Windows 按钮,点击「终端」
# 然后依次执行下面的
winget install OpenJS.NodeJS
Set-ExecutionPolicy -Scope CurrentUser RemoteSigned
# 然后关闭终端窗口,新开一个终端窗口
# 安装 claude-code
npm install -g @anthropic-ai/claude-code --registry=https://registry.npmmirror.com
# 初始化配置
node --eval "
const homeDir = os.homedir();
const filePath = path.join(homeDir, '.claude.json');
if (fs.existsSync(filePath)) {
const content = JSON.parse(fs.readFileSync(filePath, 'utf-8'));
fs.writeFileSync(filePath,JSON.stringify({ ...content, hasCompletedOnboarding: true }, 2), 'utf-8');
} else {
fs.writeFileSync(filePath,JSON.stringify({ hasCompletedOnboarding: true }), null, 'utf-8');
}"
```
### 配置环境变量
完成 Claude Code 安装后,请按照以下方式设置环境变量使用 `kimi-k2.7-code` 模型,并启动 Claude。
#### MacOS 和 Linux
```shell theme={null}
# Linux/macOS 启动 kimi-k2.7-code 模型
export ANTHROPIC_BASE_URL=https://api.moonshot.cn/anthropic
export ANTHROPIC_AUTH_TOKEN=${YOUR_MOONSHOT_API_KEY}
export ANTHROPIC_MODEL=kimi-k2.7-code
export ANTHROPIC_DEFAULT_OPUS_MODEL=kimi-k2.7-code
export ANTHROPIC_DEFAULT_SONNET_MODEL=kimi-k2.7-code
export ANTHROPIC_DEFAULT_HAIKU_MODEL=kimi-k2.7-code
export CLAUDE_CODE_SUBAGENT_MODEL=kimi-k2.7-code
export ENABLE_TOOL_SEARCH=false
export CLAUDE_CODE_AUTO_COMPACT_WINDOW=262144
claude
```
#### Windows
```powershell theme={null}
# Windows Powershell 启动 kimi-k2.7-code 模型
$env:ANTHROPIC_BASE_URL="https://api.moonshot.cn/anthropic";
$env:ANTHROPIC_AUTH_TOKEN="YOUR_MOONSHOT_API_KEY"
$env:ANTHROPIC_MODEL="kimi-k2.7-code"
$env:ANTHROPIC_DEFAULT_OPUS_MODEL="kimi-k2.7-code"
$env:ANTHROPIC_DEFAULT_SONNET_MODEL="kimi-k2.7-code"
$env:ANTHROPIC_DEFAULT_HAIKU_MODEL="kimi-k2.7-code"
$env:CLAUDE_CODE_SUBAGENT_MODEL="kimi-k2.7-code"
$env:ENABLE_TOOL_SEARCH=false
$env:CLAUDE_CODE_AUTO_COMPACT_WINDOW="262144"
claude
```
#### 确认环境变量是否生效
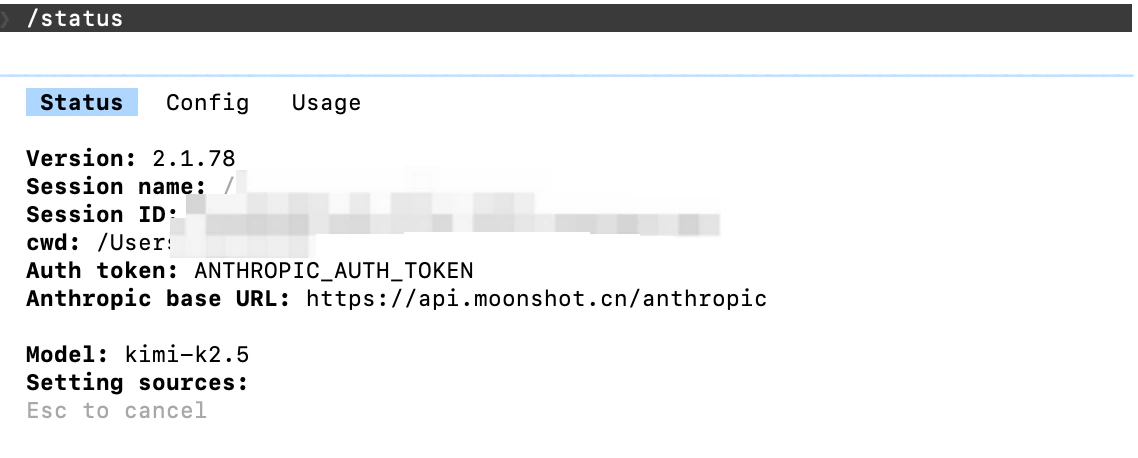
在Claude Code中输入`/status`确认模型状态:
## 在 Claude Code 中使用 Kimi K2.7 Code 模型
### 安装 Claude Code
若您已安装好 Claude Code ,可以跳过这一步
#### MacOS 和 Linux
```shell theme={null}
# MacOS 和 Linux 上安装 nodejs
curl -fsSL https://fnm.vercel.app/install | bash
# 新开一个terminal,让 fnm 生效
fnm install 24.3.0
fnm default 24.3.0
fnm use 24.3.0
# 安装 claude-code
npm install -g @anthropic-ai/claude-code --registry=https://registry.npmmirror.com
# 初始化配置
node --eval "
const homeDir = os.homedir();
const filePath = path.join(homeDir, '.claude.json');
if (fs.existsSync(filePath)) {
const content = JSON.parse(fs.readFileSync(filePath, 'utf-8'));
fs.writeFileSync(filePath,JSON.stringify({ ...content, hasCompletedOnboarding: true }, 2), 'utf-8');
} else {
fs.writeFileSync(filePath,JSON.stringify({ hasCompletedOnboarding: true }), null, 'utf-8');
}"
```
#### Windows
```powershell theme={null}
# 打开 windows 终端中的 powershell 终端
# windows 上安装 nodejs
# 右键按 Windows 按钮,点击「终端」
# 然后依次执行下面的
winget install OpenJS.NodeJS
Set-ExecutionPolicy -Scope CurrentUser RemoteSigned
# 然后关闭终端窗口,新开一个终端窗口
# 安装 claude-code
npm install -g @anthropic-ai/claude-code --registry=https://registry.npmmirror.com
# 初始化配置
node --eval "
const homeDir = os.homedir();
const filePath = path.join(homeDir, '.claude.json');
if (fs.existsSync(filePath)) {
const content = JSON.parse(fs.readFileSync(filePath, 'utf-8'));
fs.writeFileSync(filePath,JSON.stringify({ ...content, hasCompletedOnboarding: true }, 2), 'utf-8');
} else {
fs.writeFileSync(filePath,JSON.stringify({ hasCompletedOnboarding: true }), null, 'utf-8');
}"
```
### 配置环境变量
完成 Claude Code 安装后,请按照以下方式设置环境变量使用 `kimi-k2.7-code` 模型,并启动 Claude。
#### MacOS 和 Linux
```shell theme={null}
# Linux/macOS 启动 kimi-k2.7-code 模型
export ANTHROPIC_BASE_URL=https://api.moonshot.cn/anthropic
export ANTHROPIC_AUTH_TOKEN=${YOUR_MOONSHOT_API_KEY}
export ANTHROPIC_MODEL=kimi-k2.7-code
export ANTHROPIC_DEFAULT_OPUS_MODEL=kimi-k2.7-code
export ANTHROPIC_DEFAULT_SONNET_MODEL=kimi-k2.7-code
export ANTHROPIC_DEFAULT_HAIKU_MODEL=kimi-k2.7-code
export CLAUDE_CODE_SUBAGENT_MODEL=kimi-k2.7-code
export ENABLE_TOOL_SEARCH=false
export CLAUDE_CODE_AUTO_COMPACT_WINDOW=262144
claude
```
#### Windows
```powershell theme={null}
# Windows Powershell 启动 kimi-k2.7-code 模型
$env:ANTHROPIC_BASE_URL="https://api.moonshot.cn/anthropic";
$env:ANTHROPIC_AUTH_TOKEN="YOUR_MOONSHOT_API_KEY"
$env:ANTHROPIC_MODEL="kimi-k2.7-code"
$env:ANTHROPIC_DEFAULT_OPUS_MODEL="kimi-k2.7-code"
$env:ANTHROPIC_DEFAULT_SONNET_MODEL="kimi-k2.7-code"
$env:ANTHROPIC_DEFAULT_HAIKU_MODEL="kimi-k2.7-code"
$env:CLAUDE_CODE_SUBAGENT_MODEL="kimi-k2.7-code"
$env:ENABLE_TOOL_SEARCH=false
$env:CLAUDE_CODE_AUTO_COMPACT_WINDOW="262144"
claude
```
#### 确认环境变量是否生效
在Claude Code中输入`/status`确认模型状态:
 * 如何在 Claude Code 中体验 `kimi-k2.7-code` 思考能力
* 请在配置模型后,进入 Claude Code 页面后点击 `Tab` 按钮切换,切换成功可看到 "Thinking on" 的标识。
* 如何在 Claude Code 中体验 `kimi-k2.7-code` 思考能力
* 请在配置模型后,进入 Claude Code 页面后点击 `Tab` 按钮切换,切换成功可看到 "Thinking on" 的标识。
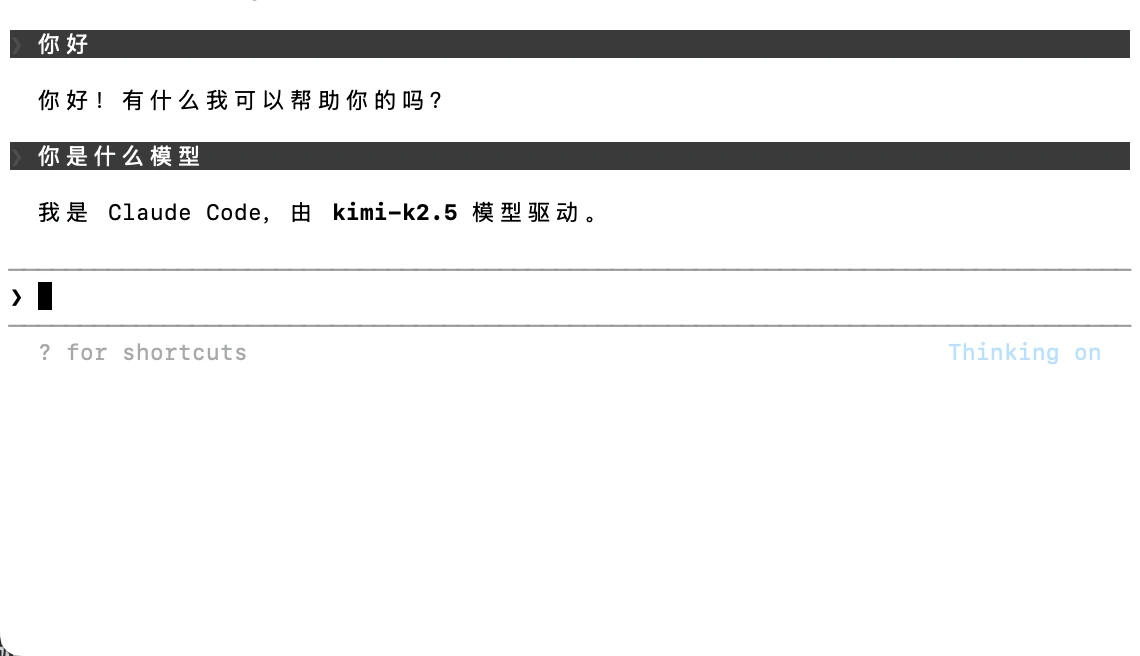 接下来就可以正常使用 Claude Code 进行开发了!
## 在 Cline 中使用 Kimi K2.7 Code 模型
### 安装 Cline
1. 打开 VS Code
2. 点击左侧活动栏中的扩展图标(或使用快捷键 `Ctrl+Shift+X` / `Cmd+Shift+X`)
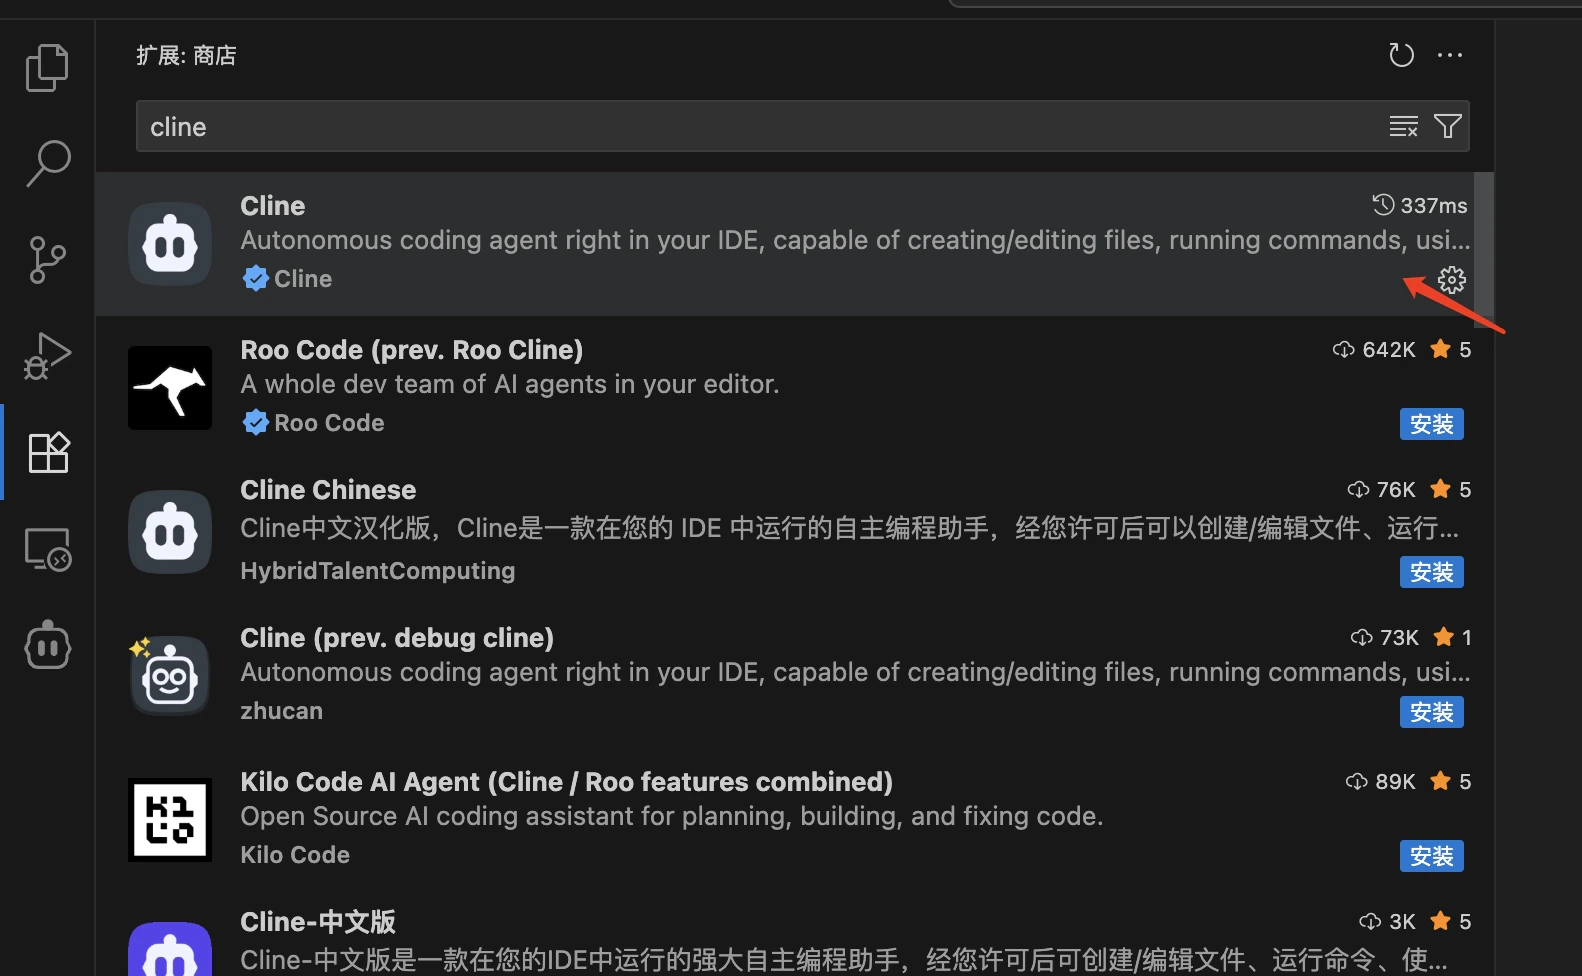
3. 在搜索框中输入 `cline`
4. 找到 `Cline` 扩展(通常由 Cline Team 发布)
5. 点击 `Install` 按钮进行安装
6. 安装完成后,可能需要重启 VS Code
接下来就可以正常使用 Claude Code 进行开发了!
## 在 Cline 中使用 Kimi K2.7 Code 模型
### 安装 Cline
1. 打开 VS Code
2. 点击左侧活动栏中的扩展图标(或使用快捷键 `Ctrl+Shift+X` / `Cmd+Shift+X`)
3. 在搜索框中输入 `cline`
4. 找到 `Cline` 扩展(通常由 Cline Team 发布)
5. 点击 `Install` 按钮进行安装
6. 安装完成后,可能需要重启 VS Code
 ### 验证安装
安装完成后,您可以:
1. 在 VS Code 左侧活动栏中看到 Cline 图标
2. 或者通过命令面板(`Ctrl+Shift+P` / `Cmd+Shift+P`)搜索 "Cline" 相关命令来验证安装成功
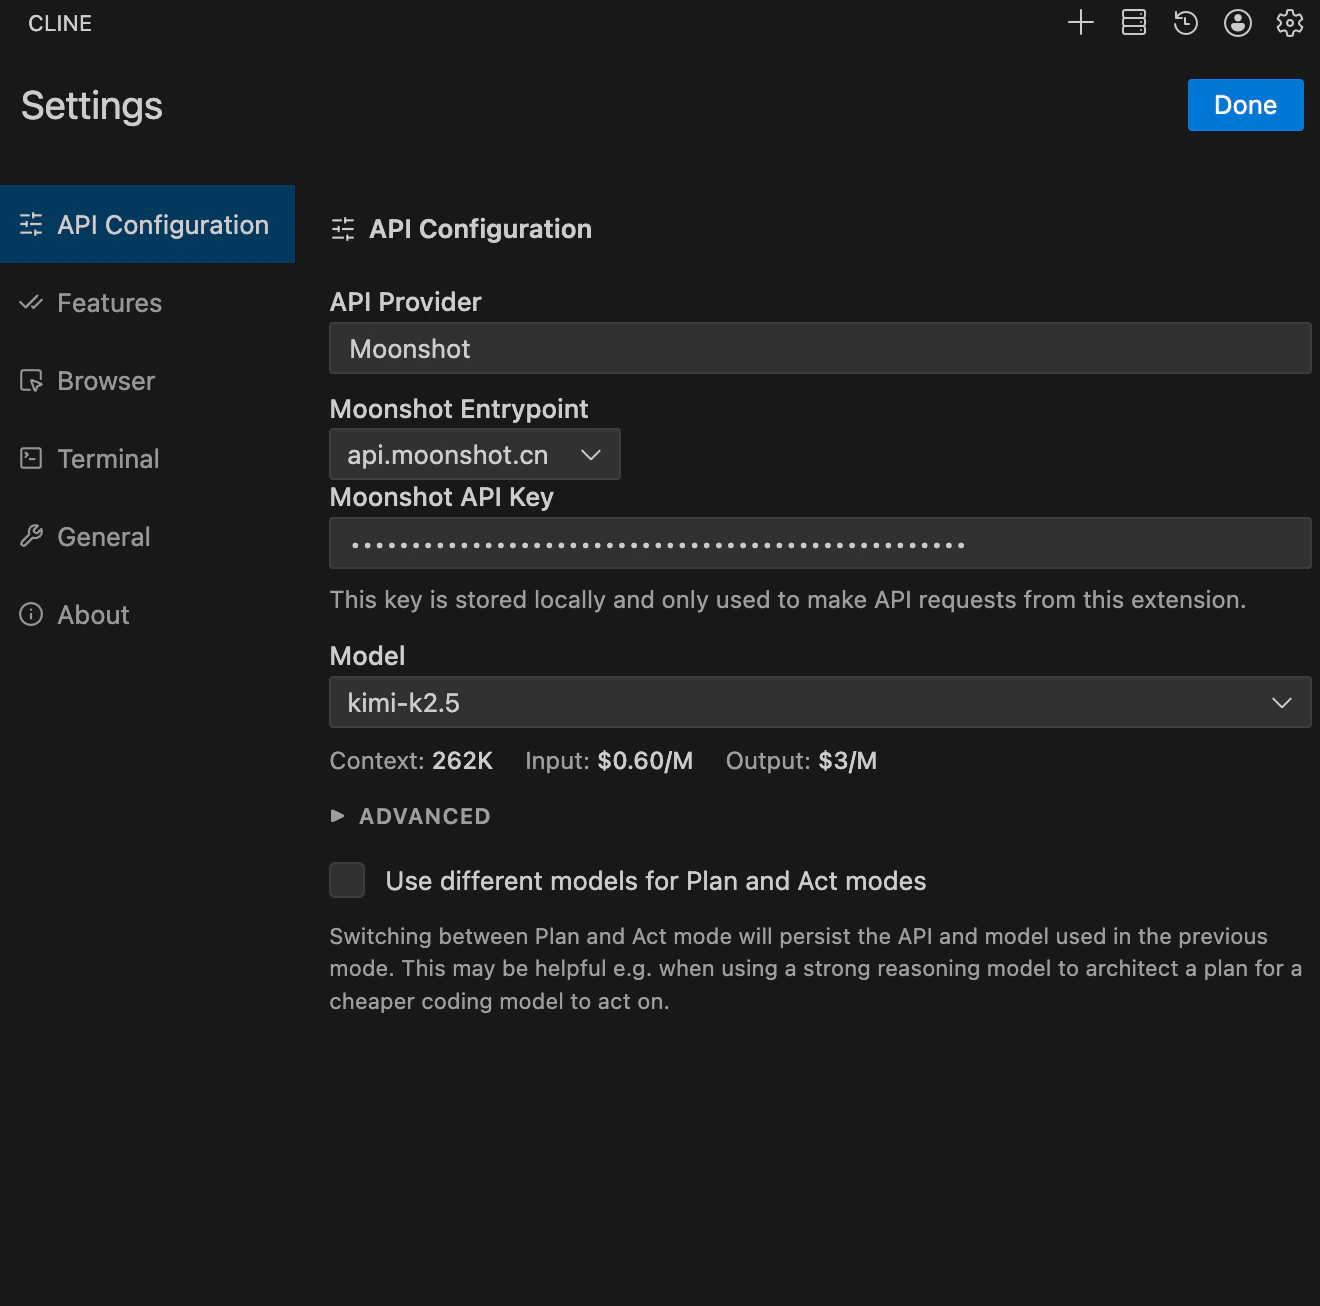
### 官方推荐:配置 Moonshot Provider 使用 Kimi K2.7 Code 模型
* API Provider 选择 'Moonshot'
* Moonshot Entrypoint 选择 'api.moonshot.cn'
* Moonshot API Key 配置从 Kimi 开放平台获取的 Key
* Model 选择 'kimi-k2.7-code'
* Browser 勾选 'Disable browser tool usage'
* 点击'Done',保存配置
### 验证安装
安装完成后,您可以:
1. 在 VS Code 左侧活动栏中看到 Cline 图标
2. 或者通过命令面板(`Ctrl+Shift+P` / `Cmd+Shift+P`)搜索 "Cline" 相关命令来验证安装成功
### 官方推荐:配置 Moonshot Provider 使用 Kimi K2.7 Code 模型
* API Provider 选择 'Moonshot'
* Moonshot Entrypoint 选择 'api.moonshot.cn'
* Moonshot API Key 配置从 Kimi 开放平台获取的 Key
* Model 选择 'kimi-k2.7-code'
* Browser 勾选 'Disable browser tool usage'
* 点击'Done',保存配置
 ### 在 cline 中体验 Kimi K2.7 Code 模型效果
* 我们让 Kimi K2.7 Code 模型写一个贪吃蛇游戏
* 游戏的效果
## 在 RooCode 中使用 Kimi K2.7 Code 模型
### 安装 RooCode
1. 打开 VS Code
2. 点击左侧活动栏中的扩展图标(或使用快捷键 `Ctrl+Shift+X` / `Cmd+Shift+X`)
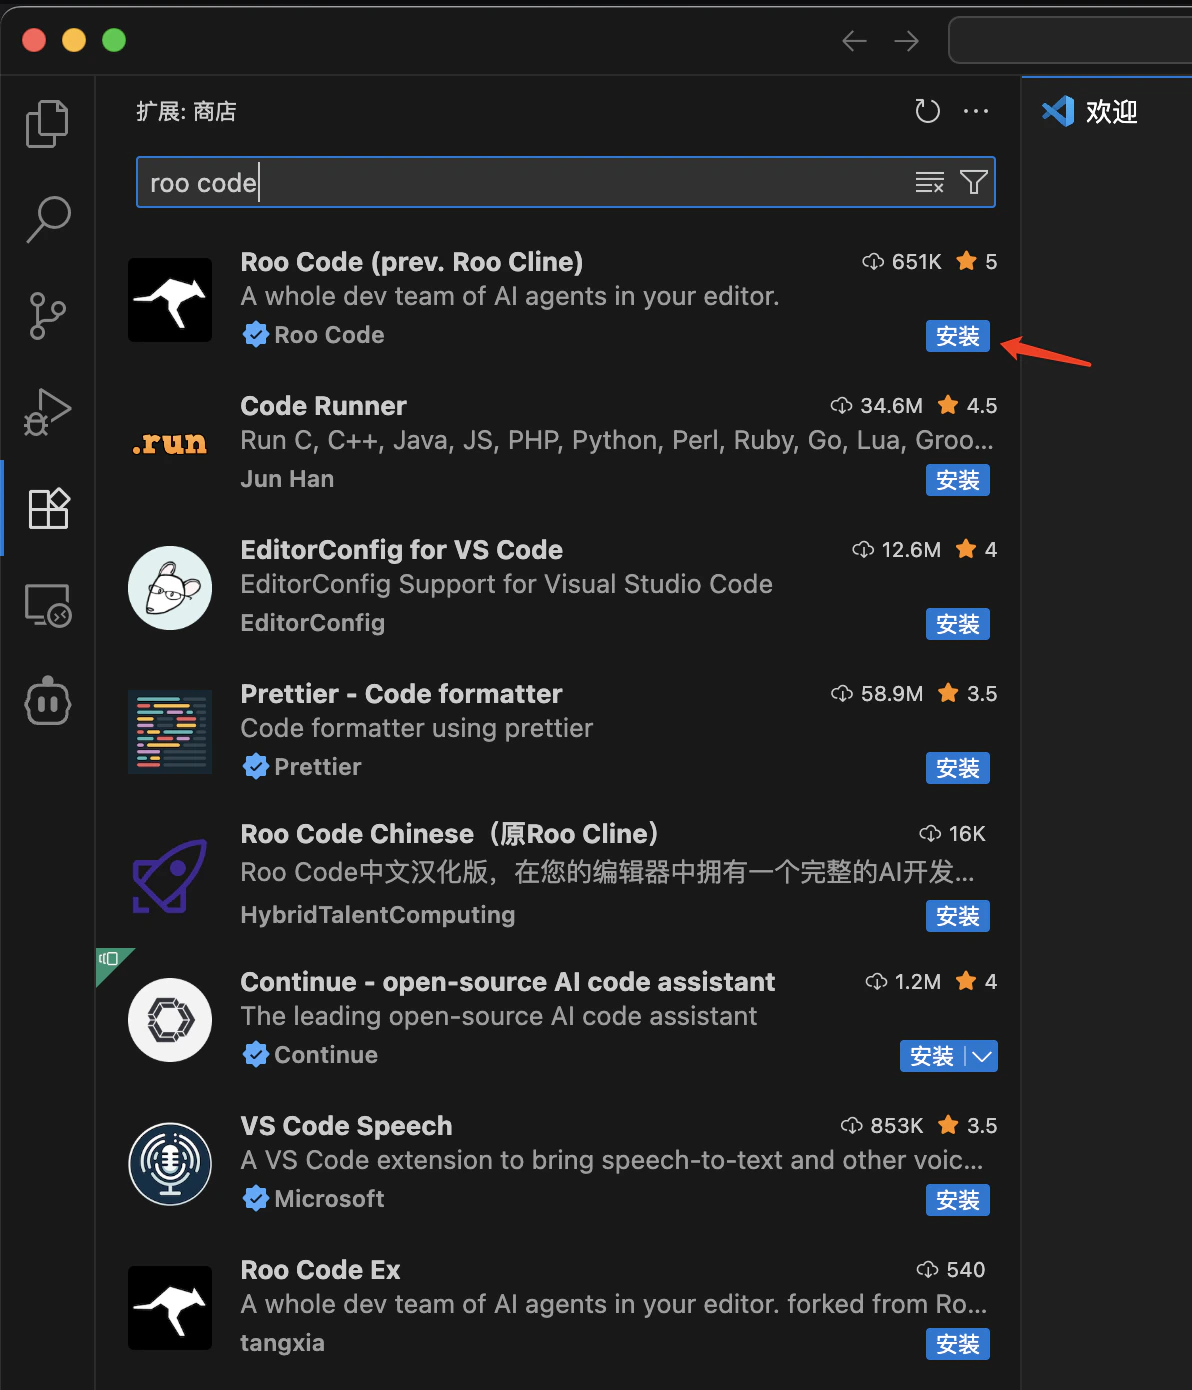
3. 在搜索框中输入 `roo code`
4. 找到 `Roo Code` 扩展(通常由 RooCode Team 发布)
5. 点击 `安装` 按钮进行安装
6. 安装完成后,可能需要重启 VS Code
### 在 cline 中体验 Kimi K2.7 Code 模型效果
* 我们让 Kimi K2.7 Code 模型写一个贪吃蛇游戏
* 游戏的效果
## 在 RooCode 中使用 Kimi K2.7 Code 模型
### 安装 RooCode
1. 打开 VS Code
2. 点击左侧活动栏中的扩展图标(或使用快捷键 `Ctrl+Shift+X` / `Cmd+Shift+X`)
3. 在搜索框中输入 `roo code`
4. 找到 `Roo Code` 扩展(通常由 RooCode Team 发布)
5. 点击 `安装` 按钮进行安装
6. 安装完成后,可能需要重启 VS Code
 ### 验证安装
安装完成后,您可以:
1. 在 VS Code 左侧活动栏中看到 RooCode 图标
2. 或者通过命令面板(`Ctrl+Shift+P` / `Cmd+Shift+P`)搜索 "RooCode" 相关命令来验证安装成功
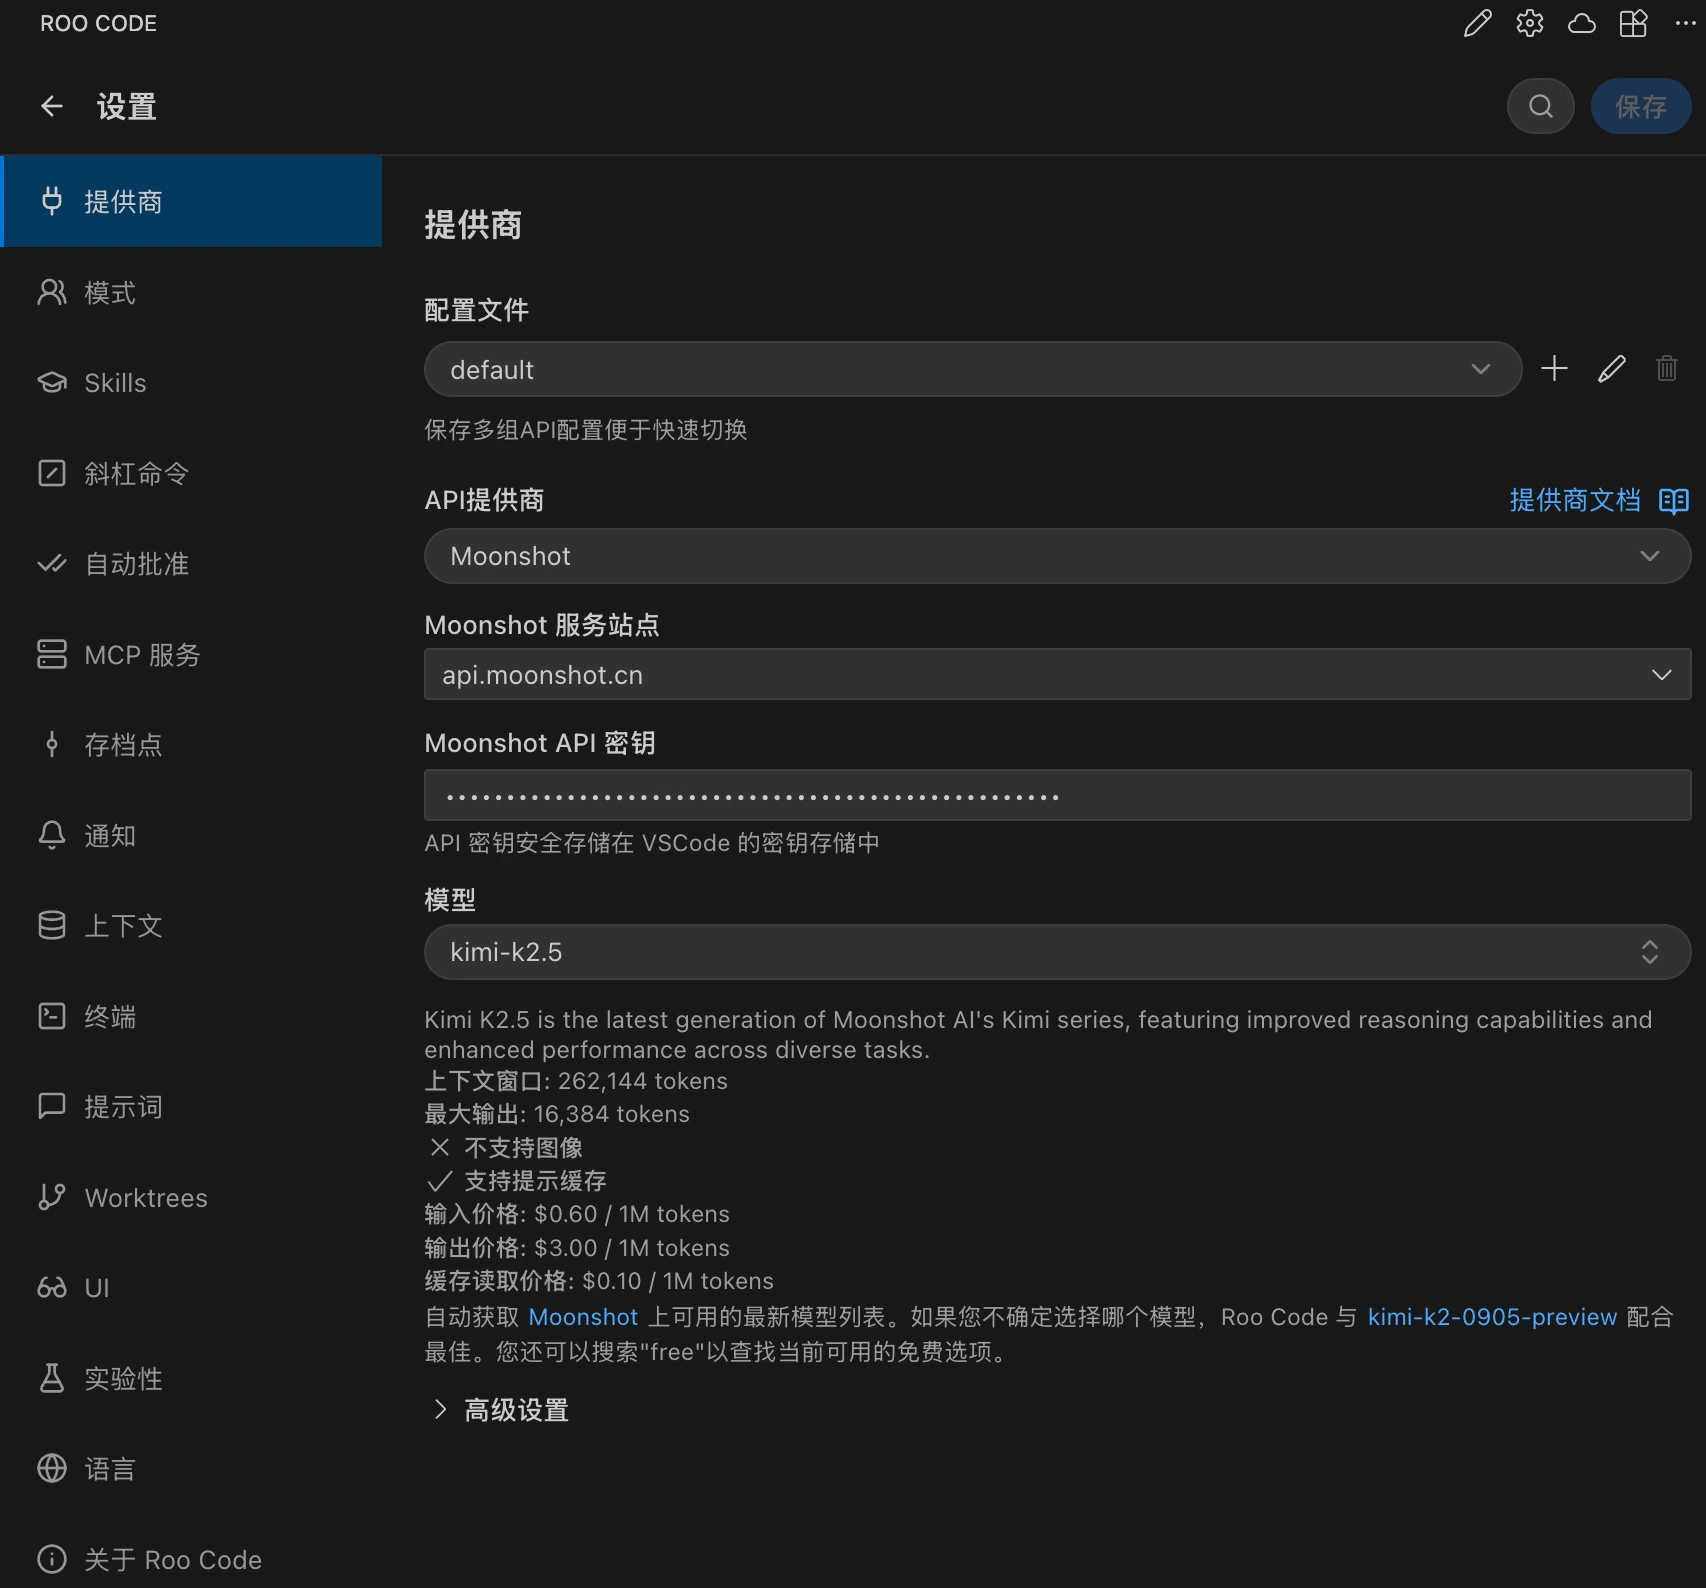
### 官方推荐:配置 Moonshot Provider 使用 Kimi K2.7 Code 模型
* API Provider 选择 'Moonshot'
* Moonshot Entrypoint 选择 'api.moonshot.cn'
* Moonshot API Key 配置从 Kimi 开放平台获取的 Key
* Model 选择 'kimi-k2.7-code'
* Browser 勾选 'Disable browser tool usage'
### 验证安装
安装完成后,您可以:
1. 在 VS Code 左侧活动栏中看到 RooCode 图标
2. 或者通过命令面板(`Ctrl+Shift+P` / `Cmd+Shift+P`)搜索 "RooCode" 相关命令来验证安装成功
### 官方推荐:配置 Moonshot Provider 使用 Kimi K2.7 Code 模型
* API Provider 选择 'Moonshot'
* Moonshot Entrypoint 选择 'api.moonshot.cn'
* Moonshot API Key 配置从 Kimi 开放平台获取的 Key
* Model 选择 'kimi-k2.7-code'
* Browser 勾选 'Disable browser tool usage'
 ## 直接使用 API 调用 Kimi K2.7 Code 模型
```python theme={null}
from openai import OpenAI
client = OpenAI(
api_key = "$MOONSHOT_API_KEY",
base_url = "https://api.moonshot.cn/v1",
)
completion = client.chat.completions.create(
model = "kimi-k2.7-code",
messages = [
{"role": "system", "content": "你是 Kimi,由 Moonshot AI 提供的人工智能助手,你更擅长中文和英文的对话。你会为用户提供安全,有帮助,准确的回答。同时,你会拒绝一切涉及恐怖主义,种族歧视,黄色暴力等问题的回答。Moonshot AI 为专有名词,不可翻译成其他语言。"},
{"role": "user", "content": "你好,我叫李雷,1+1等于多少?"}
]
)
print(completion.choices[0].message.content)
```
```bash theme={null}
curl https://api.moonshot.cn/v1/chat/completions \
-H "Content-Type: application/json" \
-H "Authorization: Bearer $MOONSHOT_API_KEY" \
-d '{
"model": "kimi-k2.7-code",
"messages": [
{"role": "system", "content": "你是 Kimi,由 Moonshot AI 提供的人工智能助手,你更擅长中文和英文的对话。你会为用户提供安全,有帮助,准确的回答。同时,你会拒绝一切涉及恐怖主义,种族歧视,黄色暴力等问题的回答。Moonshot AI 为专有名词,不可翻译成其他语言。"},
{"role": "user", "content": "你好,我叫李雷,1+1等于多少?"}
]
}'
```
```js theme={null}
const OpenAI = require("openai");
const client = new OpenAI({
apiKey: "$MOONSHOT_API_KEY",
baseURL: "https://api.moonshot.cn/v1",
});
async function main() {
const completion = await client.chat.completions.create({
model: "kimi-k2.7-code",
messages: [
{"role": "system", "content": "你是 Kimi,由 Moonshot AI 提供的人工智能助手,你更擅长中文和英文的对话。你会为用户提供安全,有帮助,准确的回答。同时,你会拒绝一切涉及恐怖主义,种族歧视,黄色暴力等问题的回答。Moonshot AI 为专有名词,不可翻译成其他语言。"},
{"role": "user", "content": "你好,我叫李雷,1+1等于多少?"}
]
});
console.log(completion.choices[0].message.content);
}
main();
```
其中 \$MOONSHOT\_API\_KEY 需要替换为您在平台上创建的 API Key。
使用 OpenAI SDK 时运行文档中的代码时,需要保证 Python 版本至少为 3.7.1,Node.js 版本至少为 18,OpenAI SDK 版本不低于 1.0.0。
## 直接使用 API 调用 Kimi K2.7 Code 模型
```python theme={null}
from openai import OpenAI
client = OpenAI(
api_key = "$MOONSHOT_API_KEY",
base_url = "https://api.moonshot.cn/v1",
)
completion = client.chat.completions.create(
model = "kimi-k2.7-code",
messages = [
{"role": "system", "content": "你是 Kimi,由 Moonshot AI 提供的人工智能助手,你更擅长中文和英文的对话。你会为用户提供安全,有帮助,准确的回答。同时,你会拒绝一切涉及恐怖主义,种族歧视,黄色暴力等问题的回答。Moonshot AI 为专有名词,不可翻译成其他语言。"},
{"role": "user", "content": "你好,我叫李雷,1+1等于多少?"}
]
)
print(completion.choices[0].message.content)
```
```bash theme={null}
curl https://api.moonshot.cn/v1/chat/completions \
-H "Content-Type: application/json" \
-H "Authorization: Bearer $MOONSHOT_API_KEY" \
-d '{
"model": "kimi-k2.7-code",
"messages": [
{"role": "system", "content": "你是 Kimi,由 Moonshot AI 提供的人工智能助手,你更擅长中文和英文的对话。你会为用户提供安全,有帮助,准确的回答。同时,你会拒绝一切涉及恐怖主义,种族歧视,黄色暴力等问题的回答。Moonshot AI 为专有名词,不可翻译成其他语言。"},
{"role": "user", "content": "你好,我叫李雷,1+1等于多少?"}
]
}'
```
```js theme={null}
const OpenAI = require("openai");
const client = new OpenAI({
apiKey: "$MOONSHOT_API_KEY",
baseURL: "https://api.moonshot.cn/v1",
});
async function main() {
const completion = await client.chat.completions.create({
model: "kimi-k2.7-code",
messages: [
{"role": "system", "content": "你是 Kimi,由 Moonshot AI 提供的人工智能助手,你更擅长中文和英文的对话。你会为用户提供安全,有帮助,准确的回答。同时,你会拒绝一切涉及恐怖主义,种族歧视,黄色暴力等问题的回答。Moonshot AI 为专有名词,不可翻译成其他语言。"},
{"role": "user", "content": "你好,我叫李雷,1+1等于多少?"}
]
});
console.log(completion.choices[0].message.content);
}
main();
```
其中 \$MOONSHOT\_API\_KEY 需要替换为您在平台上创建的 API Key。
使用 OpenAI SDK 时运行文档中的代码时,需要保证 Python 版本至少为 3.7.1,Node.js 版本至少为 18,OpenAI SDK 版本不低于 1.0.0。